Defining your own dealer domain name
The purpose of this feature is to allow you to change the domain name in the Customer communication email you send to your customers from Claire.
Example: With the Customer Communication feature, by default your customers are getting an email from no-reply@appspot.pro, which could be confusing for some customers. Now it is possible to customise it and put your own domaine name (no-reply@yourdomainname.com). Doing so, it will increase the chance that your customers open the email generated by Claire, since the email address will now contain your domain name.
Here are the steps to successfully update your domain name in Claire:
In the hamburger menu, under the Overvew section, click Dealer oveview(Note: Only a user with dealer admin role can see it).
Enter your domain name in the field called Domain name under emails setting and click Update Domain button.
DNS records information should now be visible in two boxes. Copy the information in the boxes indicated by pointing arrows on the image bellow and send to your system administrator. He needs to update your DNS records for your domain host.
Once your system administrator has confirmed that DNS records were added click Verify Domain. You will see the corners of the DNS records boxes changing to green with check marks. 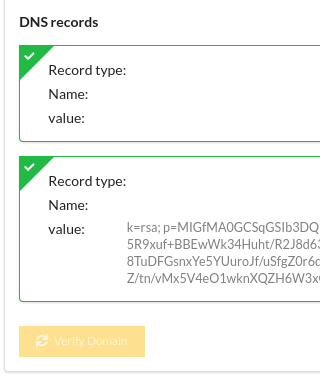
If they remain grey with question marks, it could mean that the DNS records were not copied properly.
To activate the domain in Claire, you must log out then log back in to Claire to ensure domain name was updated.
Related Articles
Using customer communication
This feature allows you to communicate to your customer details about the interventions directly from Claire in the form of an email. Inversely, the customer is able to communicate their decisions back to you, thanks to Claire's customer ...Setting up the customer communication module
Editing default customer communication email template Step 1 In the hamburger menu, under the customer comm section click Templates. Step 2 Select the template you want to modify. Step 3 From this screen you can modify the text. Note that any text ...Dealer reports
Introduction Description These reports will help you to visualize the overall usage of the Claire's processes for multiple locations. These reports allow you to compare the locations within your group and see if benchmarks were reached. How to access ...Customer communication settings (V8)
The Customer communication settings page can be found in the hamburger menu: At the top of the page, you will see several headings. Clicking on one of these headings will automatically scroll you to the desired section. Additionally, the save button ...Setting agreements in the Customer Communication module
Prerequisite You must be a user with the Dealer admin role to change settings. Adding an agreement Step 1 Go in the hamburger menu, under the Customer Comm section and click Agreements. Step 2 Click the plus sign in the red circle button at the ...